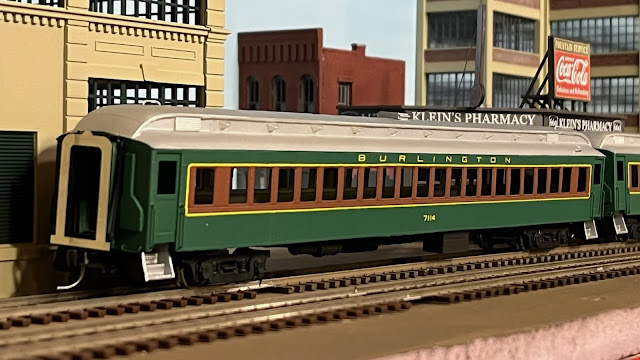
CB&Q Suburban Coaches
Going into this period, the backbone of the fleet was made up of steel open platform coaches built in the 1920s. In 1949, the Burlington started to rebuild some of these with enclosed vestibules and air conditioning. This program coincided with the purchase of new stainless steel bi-level gallery cars that began arriving in 1950. Some of the former open platform coaches were converted into power cars to supply electricity to the new gallery cars. Lastly, several heavyweight long-distance coaches were also transferred to suburban service.
This shuffling of equipment resulted in an interesting variety in suburban service that I wanted to model. This post will focus on the rebuilt former open-platform coaches of 1949.
It is somewhat difficult to accurately model CB&Q’s suburban coaches because of the lack of commercially available models. NKP Car Co. offered kits with brass car sides, but they are out of production and hard to come by. I found a resin kit by Funaro and Camerlengo based on an NYC coach that could be made into a reasonable match. I built two of the kits in parallel.
The resin sides and roof are cast as one piece. This was my first time building a resin passenger car, and I wasn’t expecting the amount of flash cleanup required. Each window opening needed to be cut out and the edges filed smooth. The bottom of the sides/ends needed to be sanded to a straight and even edge. It was not difficult work, but time consuming and tedious. In hindsight, I might have been able to build a CAD model and 3D print my own carbodies for similar effort.
Being already committed to the project, I pressed on and built the underframe per the kit instructions. I used GSC express reefer trucks from Bethlehem Car Works “kit bits” instead of the supplied trucks. I added conduit, air conditioner, and battery box details (most of which I had on-hand as leftover kit parts) based on photos of Burlington PA-14 coaches. I added diaphragms from Unreal Details. I only glued on the stationary doorframes prior to painting. The movable diaphragm pieces were added later. I left the interiors empty.
The first step in painting was to wash the entire car in soapy water to remove any mold-release compound that can affect paint adhesion. All of the Burlington’s modernized suburban cars received a new green/tan/silver/black paint scheme with yellow stripes and lettering. I used photos as color references, but was not overly concerned with finding the exact “right” shade. The colors in the prototype pictures changed depending on the lighting. I figured that as long as I was close, my cars would look reasonable on the layout.
I settled on Polly Scale Southern Sylvan Green for the body color, Polly Scale Stainless Steel for the roof, Vallejo Black for the underfame, and 50/50 mix of Vallejo Oxide Primer and Brown for the window band. The 4-color scheme required significant masking. Fortunately, I was able to use rivet lines and seams as guides along the color breaks.
Decals are available from Q Connection. Although advertised as covering 2 cars per sheet, I found there was only enough striping for about 1.5 cars. I supplemented the stripes with a sheet of MIcroscale yellow 2” (HO scale) stripes. They match almost perfectly. Striping proved to be the most difficult step and required multiple applications of Solvaset to get rid of all the air bubbles. Once finished, I sprayed the cars with a flat finish and added the movable parts of the diaphragms.
The finished cars are unique and eye-catching. I paired them with 3 unmodified 60ft Rivarossi coaches that I also painted in the same scheme. I have plans to model other CB&Q equipment, including the power cars and long-distance coaches, which will be the subjects of future posts as I build them.


Comments
Post a Comment