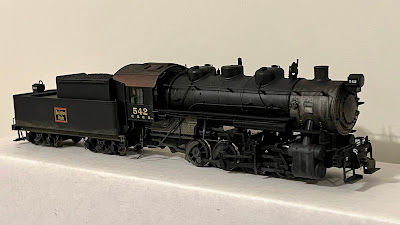
CB&Q F-1 0-8-0
The Burlington rostered 10 USRA design 0-8-0 locomotives in the F-1 class. They are one of the few classes of CB&Q steamers that can be accurately modeled from a mass-produced plastic model. On the whole, the CB&Q preferred 0-6-0s for most switching duties and had comparatively few 0-8-0s. The F-1 switchers were mainly used in the large classification yards such as Cicero, IL or Beardstown in Southern Illinois coal country.
Several years ago, I purchased a Walthers Proto USRA 0-8-0 that was factory painted as CB&Q 542. The engine is very well detailed and is a quiet runner. It came with a QSI sound decoder that was a little….meh. It ran fine and sounded okay. I used it on my home layout but never gave it any upgrades or improvements. Eventually the tinny chuff and generic whistle began to get on my nerves.
With the first section of my new layout under construction, I was inspired to spiff up the 542 and do some switching on what will eventually become an industrial district. The first order of business was to replace the old decoder.
I opened the tender and pulled out the QSI decoder by removing the two screws holding it to the tender frame. I clipped the wires close to the circuit board to allow enough length to hardwire the new decoder. The dual speakers are contained in a compact enclosure in the tender floor. I decided to keep these in place to save time and simplify the installation.
The Soundtraxx Tsunami2 decoder was smaller than the old QSI board and had no problem fitting inside the tender shell.
Although the wires coming from the locomotive matched the NMRA standard colors, I double-checked them with a multimeter before soldering each to one of the pigtails on the Tsunami2. I found the right and left rail pickup (red/black) wires reversed on the tender compared to the engine harness. This would have caused a short across the engine and tender pickups if I had not checked before hand. The other wires were correct. I covered each solder joint with a piece of heat shrink tubing.
As part of the installation, I added 1kohm resistors to the headlight (white) and rear light (yellow) wires. The QSI board had built-in resistors for the LEDs while the Soundtraxx decoder does not.
Once finished, I closed up the tender and put the locomotive on my programming track to check that there were no shorts and that I could change the address. Next I tested the engine on the layout and programmed the decoder and sound CVs to my preferences. The dual speakers were very loud at full power. I ended up turning the master volume down to about 40 (out of 255). The Tsunami2’s sound quality and motor control are excellent. It even included a CB&Q 3-chime whistle as one of the sound choices.
Since I upgraded the 542’s guts, I decided to upgrade the exterior with weathering worthy of a hardworking switcher. For inspiration I used color photos of F-1’s from one of my CB&Q pictorial books. I brush-painted a combination of water-based washes made from Vallejos acrylic paint and off the shelf enamel washes from Ammo. I applied the washes in thin layers to build up the effect until it looked similar to the pictures. I especially tried to capture the look of the soot streaks left by rain washing over the smokebox and cab roof. I used dirt and grease colored washes for the wheels and lower portions of the tender. As a final touch, I brushed black powdered pigment on the top of the cab and boiler when cinders and soot would accumulate. Everything was sealed with a light spray of flat finish.


Comments
Post a Comment