EJ&E Baldwin Centercab Part 3: Paint and Details
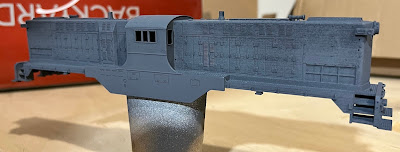
I planned to use acrylic paints for the final colors and wasn’t sure how well they would adhere to the 3D printed material. So I first sprayed the shell with gray primer from a rattle can. I used light passes until I had completely opaque coverage.
I didn’t try too hard to match the exact shade of EJ&E orange. I was not able to find color photos of the as-built scheme, and I figured fading and weathering would produce color variations anyway. I used a bottle of Polyscale GN orange that I had squirreled away for some forgotten project years ago. I airbrushed the orange in 3 coats, let the paint dry overnight, then masked the upper part of the shell to prepare for painting the frame with Vallejos acrylic flat black. Once the black paint dried, I removed the masking tape and touched up the divide between the two colors with a brush.
I sprayed the shell with Testors Glosscoat before applying the decals. I used a set from Microscale that includes the 1940s style lettering and heralds. The centercabs used an extra large “Chicago Outer Belt” herald, about double the size of the one included with the decals. I decided to live with this compromise rather than try to source a larger herald. It took multiple rounds of Walthers Solvaset to get the decals to snuggle around the numerous louvers and door details on the hoods.
With decals finished, the next step was to add final details. I made front number plates out of styrene and found jeweled number decals that seemed close to those shown in the Baldwin builder’s photos. I added a steam locomotive-style bell to the front nose, again using prototype photos as a reference. The trucks received brake cylinder and rigging details that came with the Bowser sideframes. Finally, I added the etched brass grab irons and handrails that I purchased with the shell.
Fine tuning the decoder’s CVs was the final step to ready the engine for service. Baldwin’s centercabs are rare and impressive machines. In the 3D printed shell, I was fortunate to find a reasonable alternative to the $1,500+ brass engines which are the only commercially available RTR models. This engine really turns heads and I’m proud to show it off.


Comments
Post a Comment